Beginner Written Crochet Pattern Walk-through
Now that you have been working on the basic stitches, let’s try a beginner pattern together! I really feel like walk-throughs are a very helpful way to learn, so I put together this beginner written crochet pattern walk-through to show how I taught myself.
DISCLOSURE: This post contains affiliate links, meaning if you click on a product or service, and decide to purchase it, I may receive a commission at no extra cost to you. All recommended products and services are based on my experience with them. For more information, please read my Disclaimer.
Don’t freak out! Yes, it may look like crochet patterns are written in a different language, but it’s not as bad as it looks! Patterns can be intimidating but the best way I found to learn them is to completely deconstruct them! (Well this method worked for me, so I hope it works for you)
This is a simple pattern I found on the Premier Yarns website, done by the Premier Yarns Design Team. It’s a simple dishcloth that can be used in your home. (I love making functional projects!)
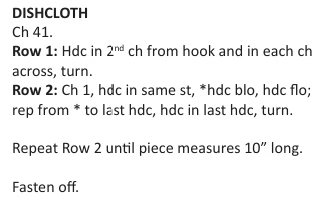
Blue Ridge Dish Cloth
Hopefully you have reviewed my post on tips on how to read a crochet pattern. If not, go check that out first and then come back here so we can continue with the beginner written crochet pattern walk-through.

Before Picking Up the Hook
Before you pick up the hook (I know you’re excited to get going, but trust me on this one) scan the pattern. Ask yourself:
- Am I planning to use the exact same yarn? If so, do I have the yarn already or do I need to go buy it?
- Do I have the proper hook size? Remember that a hook size is often recommended on a pattern so your final project ends up being the same size as expected.
- Do I have a tapestry needle to weave in the ends?
- Do I have a ruler or tape measure to measure my work?
Gauge
Next step, check the gauge. Do the gauge to test size and stitch quality compared to the expected size of the gauge mentioned. Make any adjustments as needed.
Abbreviations
Quickly review the abbreviations. This will give you a summary of the stitches and abbreviations you are expected to know for the pattern. If there are any stitches you are unsure of, check out videos on YouTube to see how it’s done or to refresh your memory.
Instructions
OK, time to get into the pattern! In this beginner written crochet pattern walk-through I’m going to break it down for you line by line. This is an easy pattern, so there aren’t too many instructions but it will give you a feel for breaking down a written crochet pattern.
Step 1:
CH 41: This means you will start the project with a slip knot so it doesn’t unravel on you(it’s assumed that you already know this as most patterns start this way if not otherwise noted in the pattern) and then do the chain stitch 41 times.
Not bad right? Let’s keep going…
Step 2:
Row 1: Hdc in 2nd ch from hook and in each ch across, turn. Ok, there are multiple steps in this instruction, so let’s break it down. First you will do a Half Double Crochet (hdc) stitch (verified in the abbreviations list on the pattern) in the second chain from the hook.
Continue doing half double crochet stitches (one in each chain) until you get to the end of your work. Once you are at the end, turn your work (flip your work over). For example, if you finish your stitch row with your hook on the right side, when you turn the work, your hook will now be on your left side.
Make sense? Ok let’s continue!
Step 3:
Row 2: Ch 1, hdc in same st, *hdc blo, hdc flo; rep from * to last hdc, hdc in last hdc, turn.
DON’T PANIC! Let’s break this one down too.
We already know that Ch = chain stitch, so the first part of the instructions is to do one chain stitch. The next part is to do an hdc (half double crochet stitch) in the same stitch that you did your ch (chain) 1.When you see a * (asterisk), this typically indicates the start of a repeating section so let’s keep reading until it tells us where it ends. It looks like the repeating part is the hdc blo, hdc flo combination.
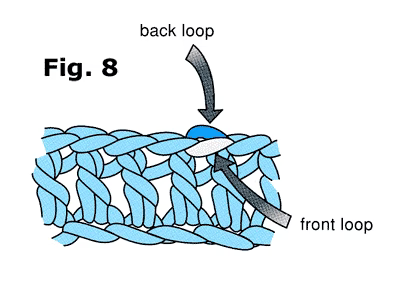
How do we know this? Because the next couple words after that combination says rep from * to last hdc which means to repeat the combination (hdc blo, hdc flo) until you get to the last stitch in your row. Blo means back loop only, and flo means front loop only. Here is an image from the Craft Yarn Council to get a better idea of which loop is front loop versus back loop (ignore the type of stitch under it):
Hdc in last hdc, turn means that when you get to that very last stitch of the row you will be ending the row with a half double crochet stitch and then you will turn your work.
Still with me???? Woooooo lets go!
Step 4:
Repeat Row 2 until piece measures 10” long. OK this part of the instruction is telling you to follow row 2 instructions again to make row 3, 4, etc. So follow the same instructions for each row until your dishcloth measures 10” tall/long.
Step 5:
Fasten off. This instruction is telling you to end your work. To “fasten off” is to cut the yarn so that you leave a few inches on it (the tail). Then, with your hook, pull the tail through the loop on your hook. Remove your hook and pull on the tail to tighten (which creates a knot).
Step 6:
Now for the finishing step! Weave in ends. Take your tapestry needle and thread it with the “tail” from when you fastened off. Use the tapestry hook to weave the tail through the existing stitches in your work. I recommend going back and forth about 2-3 times so that the tail doesn’t just easily fall out the first time you use it. Don’t be afraid to search this up on YouTube if you need a visual!
CONGRATULATIONS!
You’ve just finished your very first dishcloth! You should be proud of yourself! (I’m also proud of you!) Keep practicing and don’t be afraid to try other beginner/easy patterns to hone your skills!
There are lots of available and FREE patterns out there on the internet. Some are created by other crocheters and designers. Some free patterns are also offered on some of the major craft and yarn brand websites too! Check out some of the free patterns by Yarnspirations for more ideas! You can sort by skill level and other filters to find the type of project you are looking for or to find inspiration for your next project!

Thank you for this. I’m a beginner crocheter and this will be very helpful.
You’re welcome! Enjoy the journey!